Accidentally deleted files

Accidentally deleted files? STOP & read this

Being normal human beings, we are occasionally prone to making serious mistakes, and one of the most undesired ones is losing your data by accidental file or folder deletion.

If you accidentally deleted files on your Windows computer, STOP & follow this procedure.

We live in a world of YouTube and other social networks where professional advice is not always seen first. This, unfortunately, leads to several unsuccessful attempts before all options are exhausted, and the client seeks professional help from a data recovery company.

If you are a Windows user, you are most likely using Windows 10 on your laptop or a desktop computer.

Windows 11 is already here, so the procedure below applies to Windows 11 as well.

Windows 10 is programmed to automatically defragment disk space to organize your data, which in return speeds up the overall performance of your computer by optimizing where data on your hard drive or a solid-state drive is located. This also helps to prolong the lifespan of your storage media.

Usually, by default, Windows 10 or Windows 11 would have the defragmentation enabled as a scheduled service at the time of the initial setup, so it is being executed once a week without users’ intervention.

All are great; however, not in a situation when an accidental data deletion has occurred.

If you accidentally deleted files and lost data, we strongly recommend turning off your computer and seeking professional help; however, we understand that living in the era of  YouTube many try finding help online first. A phone call to a professional data recovery company might be a good starting point just to gather some of that useful information that may come helpful and prevent possible further data loss.

Unfortunately, sometimes we get projects where clients seek our help only after trying all possible methods, including YouTube, friends, IT guy, etc.

By immediately turning off the defragmentation service on your Windows 10 computer, you would ensure that your lost data can still be recovered by a professional data recovery company.


Follow these steps to turn off defragmentation immediately if you accidentally deleted files that you wish to recover:

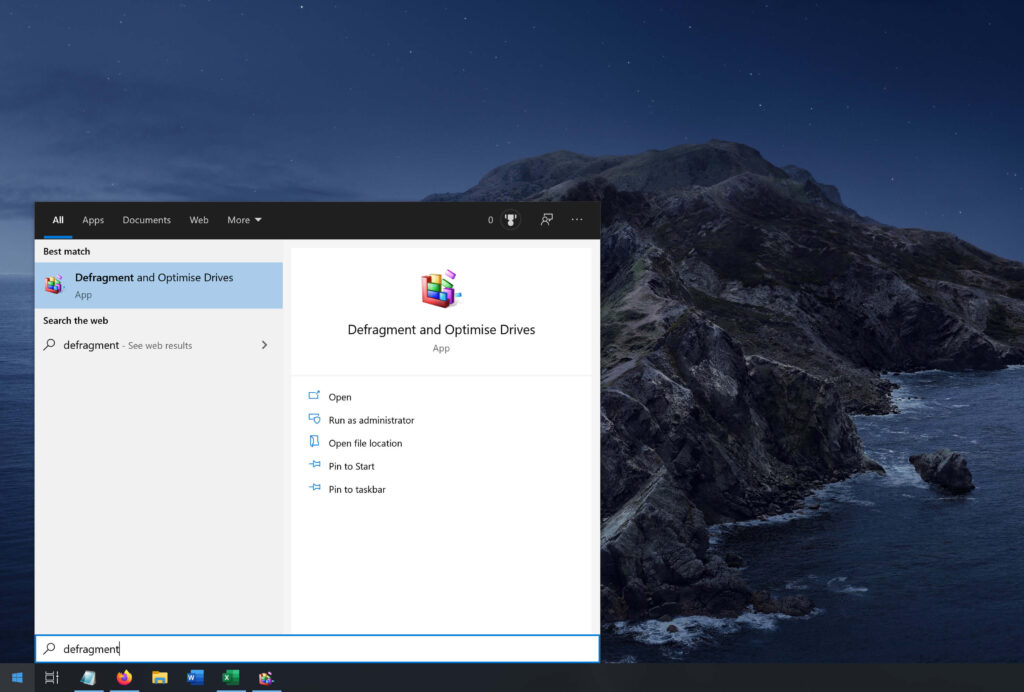
1) Go to the Start menu and type “defragment”. You will see an icon of the application called “Defragment and Optimize Drives”.
hard drive ssd defragmentation

Click that icon to launch the Defragmentation application.


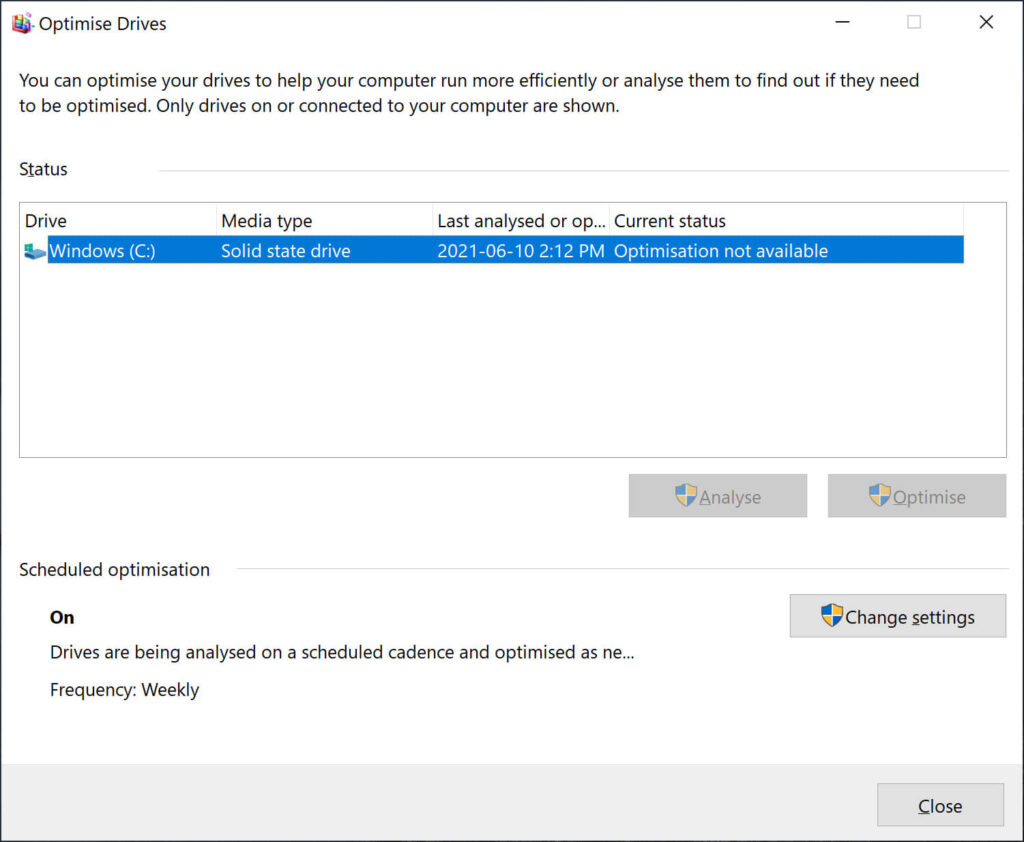
2) Once the application is open, navigate to the button that is called “Change settings”. Click on it to open another window.
hard drive ssd defragmentation


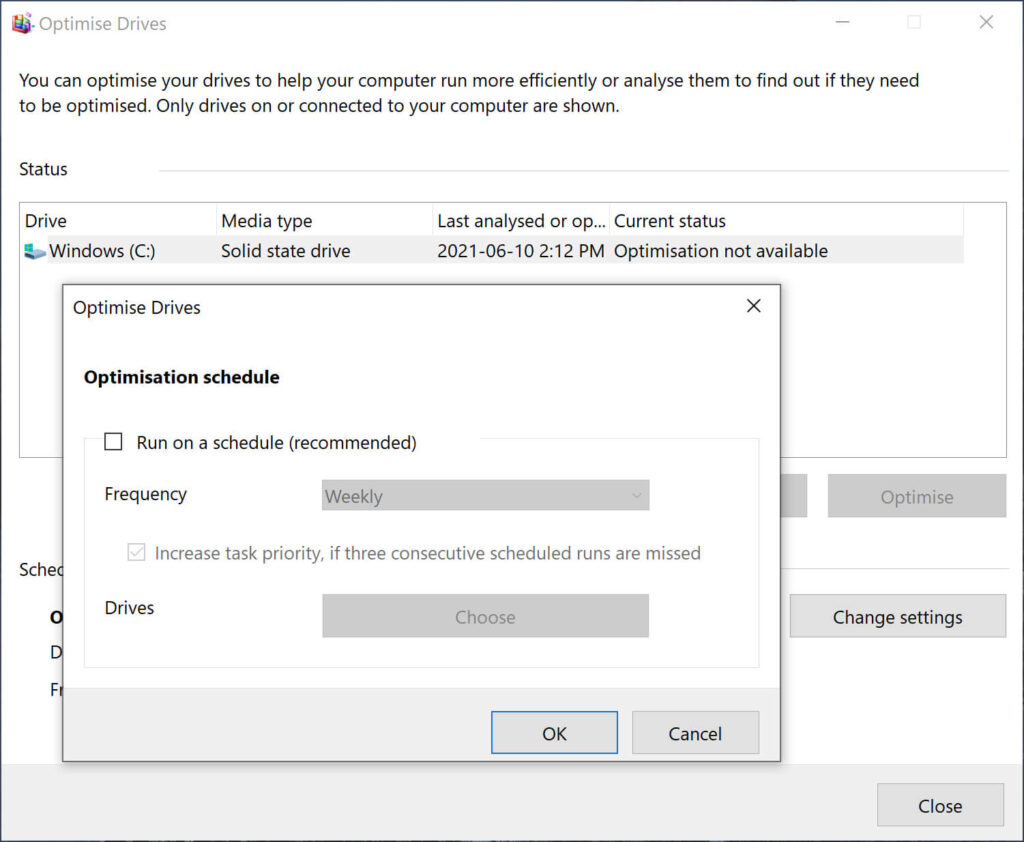
3) Find the “Run on a schedule” line and uncheck to the left of it.
hard drive ssd defragmentation

4) Click “OK”.

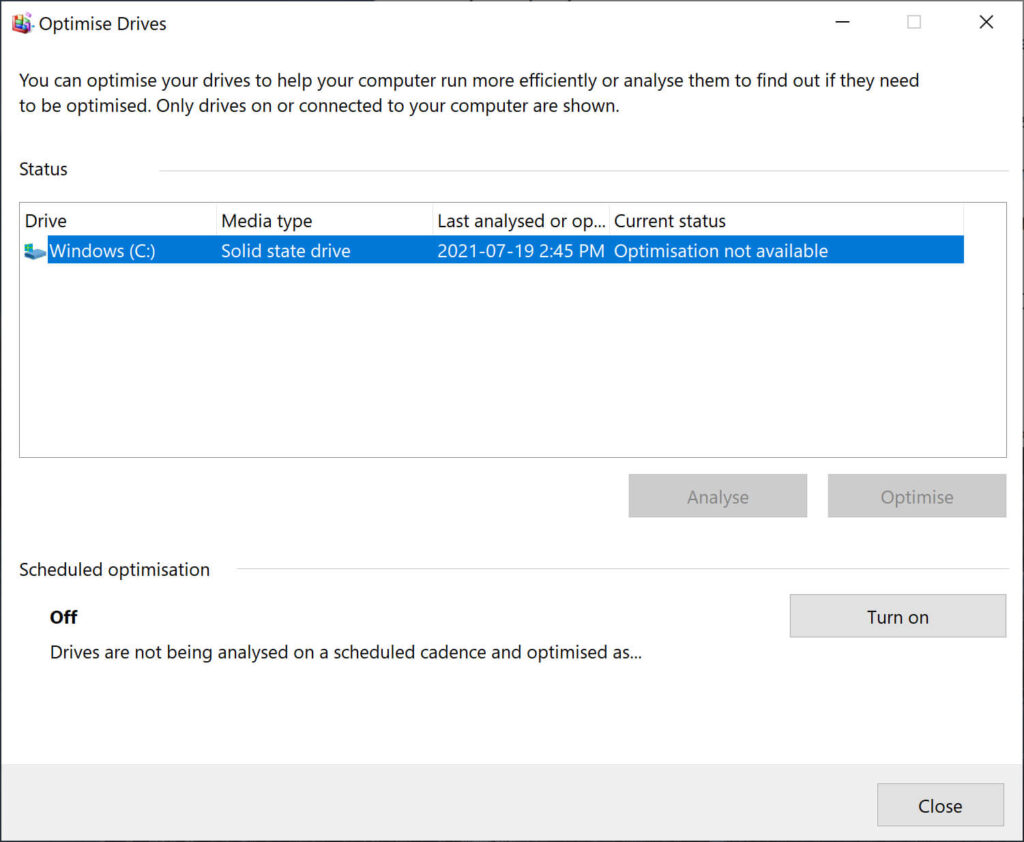
Ensure that “Scheduled optimization” shows “Off”.
hard drive ssd defragmentation

Congratulations, you have successfully turned off storage defragmentation.

At this point, we strongly recommend seeking professional help if your data is important. You may also wish to share this with your friends and family just to keep them informed in case this ever happens to them. They will definitely thank you for that.


Windows 10 VPN L2TP

Windows 10 VPN L2TP nightmare (Solved)

This is not a data recovery-related post, but we are sure it will help others.
After the recent Windows 10 Creators update, my VPN L2TP connection stopped working.
If I were to connect with PPTP, it would work fine, but we don’t want to use that protocol due to its weaker security vs L2TP.
When trying to connect, this is the error message I was getting:
———
The network connection between your computer and the VPN server could not be established because the remote server is not responding. This could be because one of the network devices (e.g, firewalls, NAT, routers, etc) between your computer and the remote server is not configured to allow VPN connections. Please contact your Administrator or your service provider to determine which device may be causing the problem.
———
Windows 10 L2TP VPN Connection Error Message
After reinstalling the VPN server on the Synology NAS (that’s where I was connecting before), removing and adding the VPN to Windows 10… Changing the IP addresses, researching the tech forums… I thought that’s it… I need to reinstall Windows 10 on my laptop.
My two other systems running Windows 10 and Windows 7 worked fine; however, one of them didn’t want to cooperate. Since the best/easiest way to fix any windows problem is to format your drive and reinstall a fresh copy of Windows, I was tempted to take that route.
I finished a full backup of my laptop and was about to start the above formatting/re-installation when I thought…let me try this last thing…maybe that would do the trick…
– I opened the Device Manager and located the Network Adapters, WAN Miniport (L2TP). I quickly re-installed it, rebooted the laptop, and Voila!… I got the L2TP to work! I thought, well, maybe just a glitch.
Reinstalling L2TP Protocol
When I decided to connect again the next day I was greeted with that same nasty error message again. This time uninstalling the L2TP protocol didn’t work, so I was looking for a better, permanent solution. At that point, I was determined that it’s something to do with the registry, so formatting the drive and reinstalling wasn’t an option anymore, as I took this issue as a challenge.
Hours of research later, I found this registry trick, which worked like a charm.
It’s a simple manipulation that would do the trick:
1 – Right-click on the bottom left Windows Start icon
2 – Select Run
3 – Type “regedit” (without quotations) and press Enter
4 – Go to HKEY_LOCAL_MACHINE\SYSTEM\CurrentControlSet\Services\PolicyAgent
5 – Right-click and select New > DWORD (32-bit value)
6 – Name it AssumeUDPEncapsulationContextOnSendRule
7 – Set the value to 2
8 – Reboot your computer.
9 – That’s it. You are done.

After several reboot attempts, the VPN is working like before, without any problems. Share the article if you think it can help others.